What is a DNS MX Record?

- 24 April 2025
DNS MX (mail exchange) records are among the most crucial aspects of modern email communication. These DNS records facilitate email communication in conjunction with the Simple Mail Transfer Protocol (SMTP). In this article, we will explore what MX records are, their format, and their functionality.
We will also explore methods for performing an MX record lookup, as well as how to create and add them to domains using popular hosting services.
MX Record Definition
An MX record instructs an email client on where to direct email. These records define the mail server that receives and routes all emails on behalf of a domain.
Without an MX record, it is not possible to resolve email client DNS requests. To illustrate this further, we will show you the working of an MX record in the “Usage and Function” section. But before that, let’s take a look at the formatting of the record.
Format of an MX Record
It is crucial to understand the format of an MX record to comprehend its function. So, let’s take a look at its format.
|
Domain Name |
TTL |
Record Class |
Record Name |
Priority |
Value/mail server |
|
whatsmydns.me. |
255 |
IN |
MX |
60 |
linda.mx.cloudflare.net. |
|
whatsmydns.me. |
255 |
IN |
MX |
2 |
isaac.mx.cloudflare.net. |
|
whatsmydns.me. |
255 |
IN |
MX |
70 |
amir.mx.cloudflare.net. |
As you can see, it has the default fields present in all records, such as Domain, TTL, Class, Name, and Value. However, there is one extra field called Priority. Let’s see what each of these means.
- Domain Name: This is the name of the host domain for which the record defines the mail servers.
- TTL: This is the amount of time in seconds for which the record is considered valid. The standard TTL for an MX record is 3600 (seconds) which amounts to 1 hour. After the TTL is passed, the record is replaced with an updated version. Domains may keep a smaller TTL when they are about to update the records.
- Record Class: The class of the record is IN, which stands for Internet. This is the default class of records.
- Record Name: The record name is MX, which stands for Mail Exchange.
- Priority: This is an exceptional value present only in MX records. It is used for load balancing. A domain can have multiple mail servers. By assigning priority values, this record defines which server is prioritized for receiving emails. In our current example, we have three priorities: 60, 2, and 70. The server with priority value 2 is the one that will receive the brunt of the emails.
- Value/Mail Server: This is the mail server that receives emails on behalf of the domain.
How to Do an MX Record Lookup
Looking up DNS MX records has various uses, including troubleshooting, verifying information, and enhancing security. So, here’s how you can do an MX record lookup.
-
With Online Tools
One of the simplest and easiest ways of doing a record lookup is to use an online MX record lookup tool by whatsmydns.me.
With such a tool, all you need to do is input a domain name, and the tool will handle the rest and display the public MX records if they exist.
- Open the MX Record Lookup Tool
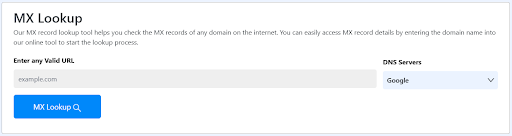
- In the MX lookup interface, type in the domain name. Also, specify the DNS server on which you want to check the records.
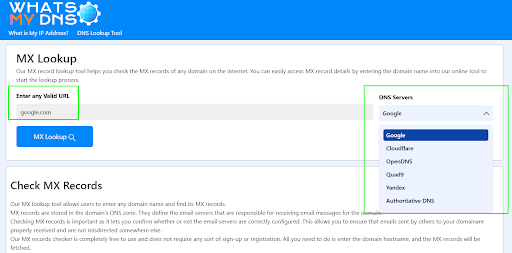
- Click on the “MX Lookup” button to see the relevant records. You will see an output like this:
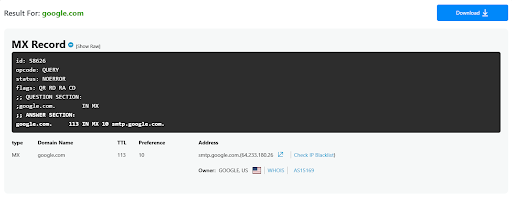
You can see that the record is displayed in both a user-friendly way and in its raw form. That is how you can perform an MX record lookup using an online tool.
-
With Command Prompt or Terminal
You can also perform an MX record lookup in Windows, Ubuntu, and macOS using their respective versions of the command prompt or terminal. All you need to do is input a specific command to do the lookup. No fancy installation or setup is required.
So, let’s see how you can do it.
In Windows
To do an MX record lookup in Windows, do the following.
- Press “win+R”
- In the “Run” application, type “cmd” and hit enter
- In the command prompt, type the following command
nslookup -q=mx microsoft.com
You can replace the green text with a domain name of your choosing, such as google.com, yahoo.com, etc.
- You will get the following output:

The record information is given under the “Non-authoritative answer” text.
In Ubuntu/Mac
Ubuntu and Mac users can use the same instructions to do an MX record lookup. Here’s what you need to do.
- Open the terminal by pressing “Ctrl+Alt+T” in Ubuntu. In Mac, press “Command+space” to bring up Spotlight search. Search for “terminal” and open it from the results.
- In the terminal, write the following command:
dig microsoft.com MX
Or
dig microsoft.com MX @dns.google
You can replace the green text with any domain name of your choice. Both commands will function similarly and yield nearly identical results. The “@dns.google” is just used to specify that you want to check the records in the Google public DNS server. You can replace this with any other DNS domain/IP to check the records stored in it.
- After confirming the command, you will get the following result:

The MX record information is under the “Answer Section”.
So, that’s how you can do an MX record lookup in Mac and Ubuntu.
MX Record Usage and Function
Now, let's see how an MX record works. We will use a scenario to describe the functionality.
Imagine you have to send an email to Microsoft. Here’s what will happen.
- You will compose an email in Yahoo!, Outlook, or Gmail and hit send.
- Your email client will act as a message transfer agent (MTA). It will initiate the email delivery process.
- The first thing the MTA will do is a DNS lookup for the recipient’s domain. Since you are sending an email to Microsoft, the domain will be “@outlook.com”.
- The DNS query will be resolved when the MTA gets the MX records from the DNS server.
- These MX records show which email server receives the emails for the “@outlook.com” domain.
- Now, a priority check will happen (if there are multiple mail servers). The lower the priority value, the more preferred the server is. Therefore, if an MX record has a value of 5, it indicates that the server is of higher priority than a server with a value of 10.
- Once the priority server is identified, the MTA will establish a connection with it using SMTP. It will then transmit the email to the server.
This is how MX records are used in a standard scenario.
Now, let’s discuss the “Priority” value a little more. Why is it required?
Well, it is used for load balancing. It is possible to set up multiple email servers for a domain. However, not all servers are required to be working at max capacity all the time. Often, just one server is enough. When that server is given priority, it will automatically handle all emails. If it becomes encumbered with too many requests, a backup server (of lower priority) will take over and lighten its load.
Another situation occurs when two servers have the same priority. In that case, they will deal with an equal number of emails. So, that’s how the “Priority” feature can be used for load balancing.
How to Create MX Records for a Domain with Different Webhosts
Domain owners/managers are responsible for adding the records of their domain. If you manage a domain or are interested in doing so in the future, it's essential to know how to add DNS records using popular hosting services.
Let’s see how you create and add mail exchange records of a domain using some of the well-known hosting services available.
How to Add DNS MX Records with Bluehost
To update the MX records for your domain in Bluehost, follow these steps.
- Log in to your Bluehost account.
- Navigate to the Domains tab in the left-hand menu.
- Select the domain whose MX records you want to manage.
- Click on “Manage” next to the domain.
- Select the “DNS” option.
- In the new menu, you will find the option “Add New Record.” Click on it and select MX.
- Enter the rest of the data and click “Save.”
Now, your MX record has been created. To edit an existing record, follow steps 1-6, then instead of clicking “Add Record”, simply scroll until you find the record you want to edit. Click on the ellipses (three vertical dots) to see the option for editing. Click on it, update the information, and save.
How to Add DNS MX Records with GoDaddy
If you are using GoDaddy as your hosting provider, you can follow these steps to create and add an MX record for your domain.
- Log in to your GoDaddy account and head to the Domain Portfolio.
- Select the domain whose MX record you want to create.
- In the domain menu, select DNS and then DNS Records. This will open a list of all DNS records for the selected domain.
- At the top of the list is the “Add New Record” button. Click it.
- In the new pop-up/dropdown menu, click on “Type” and choose “MX.”
- In the “Name” section, input either “@” to put the record on your root domain or enter a prefix to set the record on that. So, if your domain was example.com, a prefix like “mail” in the name section will translate to “@mail.example.com.”
- Enter the priority value and the Time To Live (TTL) value. You can ignore the TTL if you prefer, as it defaults to 3600.
- In the “Value” section, add the domain of the mail server that will be receiving the emails for that domain.
- Select “Save” to add the record.
To edit an existing record, follow steps 1-3. In the list of records, find the record you want to change, click the check box on it, and then click the “edit” icon. Make the changes to the record and select “Save” to finalize the editing.
How to Add DNS MX Record with Hostinger
To add an MX record in Hostinger, follow the given steps.
- Log in to Hostinger
- Navigate to the “Domains” section
- Find the domain where you want to add the record. Click on “Manage” next to it.
- Look in the left navigation pane. You will find “DNS/Nameservers.” Click on it.
- You will find a section titled “Manage DNS Records.” Here’s where you can add values in a record format to create the record.
- In the “Name” field, either put “@” if the record is for the root domain. If it's for a subdomain, simply enter the subdomain's prefix. For example, if the record is for “help.example.com,” then just input “help.”
- In the “Mail Server” field, enter the complete domain name of the mail server. Hostinger has the following mail servers: mx1.hostinger.com and mx2.hostinger.com.
- Input the TTL. The default value is 14400 (4 hours), and Hostinger recommends using that value.
- Input the priority. For Hostinger mail servers, the priorities are 5 for mx1 and 10 for mx2.
- Click “Add Record” to create the MX record.
If you want to edit an older record, then redo steps 1-4. After that, simply scroll through the records until you find the one you want to edit.
Conclusion
This concludes our article on mail exchange records. In this article, we covered the definition, format, and usage of the MX record. We also examined how to perform an MX record lookup in various ways. We also covered how to add MX records in various popular hosts.
Related Blogs
What is a DNS Zone: All You Need to Know About?
DNS Zones Made Easy — Understand What Keeps Your Domain Running
- 26 May 2025

What Is a DNS Server and How Does It Work?
Learn what a DNS server does, how DNS translates domain names into IP addresses, and how different DNS server types work together to load websites quickly.
- 19 Jan 2026

What is a Network Interface Card (NIC) | Components, Types, & Working Explained
Learn what a Network Interface Card (NIC) is, how it works, and why it matters - explained in simple words for everyone.
- 05 Jun 2025