How to Flush DNS Cache

- 22 April 2025
A DNS cache is a temporary data storage on your computer/device that holds the IP addresses of all websites you visit frequently. The data is stored in the form of A records, which are DNS records that list the domain name and IP address of that domain.
Other records, such as CNAME or AAAA records, are also stored in the cache if they are relevant.
Flushing a DNS cache means you wipe it clean, and the next time you visit a website, your device will do a complete DNS lookup to find the IP addresses of the websites again.
Flushing a DNS cache is required when your cache has faulty or outdated data that results in 404 errors. When a cache is faulty, anytime you try to visit a website whose IP address is in the cache, you will be met with a 404 error or a timeout.
Flushing the DNS cache will purge that faulty data, and your device will obtain new and updated data. This is why it is good to know how to flush the DNS cache.
How To Flush DNS Cache
Here’s how you can flush the DNS cache on your devices.
-
In Windows
In Windows 10 and up, you can flush the DNS cache very easily. Simply take the following steps.
- In the search bar, type “cmd” and hit Enter. This will open the command prompt.
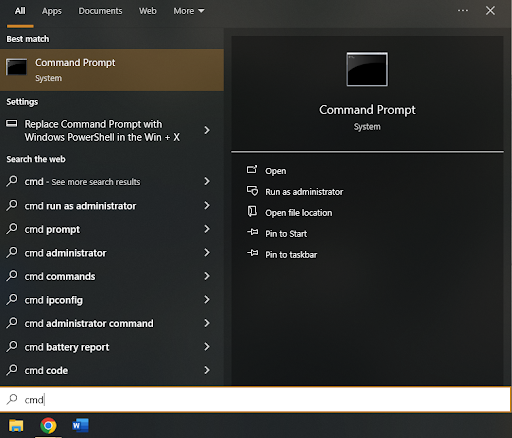
- In the command prompt, enter the following command:
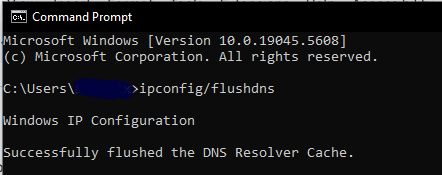
ipconfig/flushdns
In Windows 7, you can open the terminal by following these steps.
- Open the start menu
- Go to “all programs”
- Go to “accessories”
- Find the command prompt and run it as an administrator
- In the command prompt, enter the ‘ipconfig/flushdns’ command
If everything works, then you will see a message that says “Windows IP configuration successfully flushed the DNS Resolver Cache.”
That means your DNS cache is flushed successfully.
-
In macOS
macOS has a lot of versions, and Apple has changed how each version handles DNS cache. That’s why there are different commands for each version.
Each command has to be entered into the terminal so that the part remains constant for all versions. The commands for Mac OS Snow Leopard and up are given below.
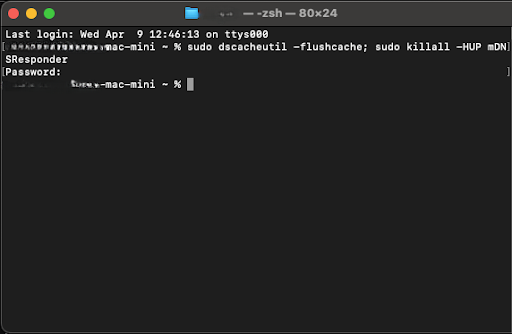
- For macOS versions 10.11 (El Capitan) and 10.15 and up (Sonoma, Monterey, Ventura, Big Sur, and Catalina), use the following terminal command.
sudo dscacheutil -flushcache; sudo killall -HUP mDNSResponder
- For macOS versions 10.7 to 10.9 (Mavericks, Lion, Mountain Lion) and 10.12 to 10.14 (Mojave, High Sierra, Sierra), the terminal command is as follows.
sudo killall -HUP mDNSResponder
- For macOS version 10.10 (Yosemite), the command is as follows.
sudo discoveryutil mdnsflushcache
- For macOS version 10.6 (Snow Leopard), the command is as follows.
sudo dscacheutil -flushcache
- For macOS version 10.4 (Tiger), the command is as follows.
lookupd -flushcache
To run the command, you will need to provide the admin password. If the command succeeds, you will receive either no message or a successful cache purge message, depending on your version.
-
In Linux
Linux has many distributions, and not all of them have a local DNS cache. Also, there are different systems that manage DNS in different Linux distributions, like systemd-resolved, dnsmasq, BIND, or nscd. So, you may have to try out a variety of commands before you can succeed. Given below is a list of common commands for popular DNS management systems found in Linux.
As with Mac OS and Windows, the commands need to be entered in the terminal. In most Linux distributions, you can open the terminal with the “Ctrl+Alt+T” shortcut.
Once in the terminal, you will have to use one of the following commands.
-
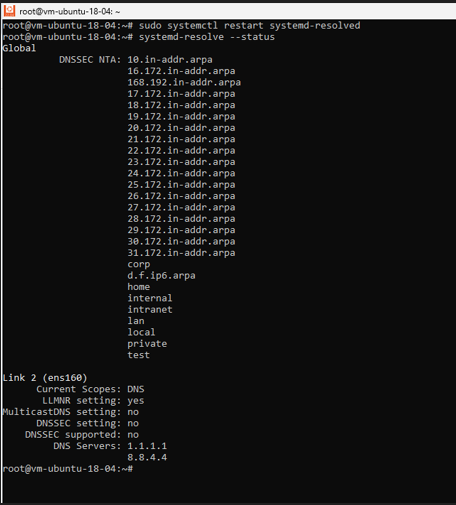
For systemd-resolved (Most Modern Linux Distros - Ubuntu 18.04+, Fedora, Arch, etc.)
sudo systemctl restart systemd-resolved
or
sudo resolvectl flush-caches
To verify if the cache is cleared:
resolvectl statistics
-
For nscd (Name Service Cache Daemon - Older Ubuntu, Debian, CentOS)
sudo systemctl restart nscd
or
sudo nscd -i hosts
-
For dnsmasq (Lightweight DNS Server - Some Ubuntu/Debian/CentOS Setups)
sudo systemctl restart dnsmasq
or
sudo killall -HUP dnsmasq
& For BIND (Named DNS Server - Used on DNS Servers)
sudo rndc flush
or
sudo rndc restart
-
In Android
There is no way to clear the DNS cache using a system setting in Android. However, you can clear your browser’s cache using its own settings. For example, if you are using Chrome, then you can take the following steps to flush the cache.
- Open Chrome browser
- In the URL bar, type in chrome://net-internals/#dns:
- In the left pane, select DNS.
- In the right pane, tap the Clear host cache button.
And that should clear the cache.
-
In iOS
In iOS 14 and above, you can easily flush the DNS cache by just turning on Airplane mode and then turning it off. Be sure to take a few moments before turning the Airplane mode off.
Airplane mode in iOS automatically clears the local DNS cache, so you don’t have to do any complicated steps.
Conclusion
So, there you have it, the myriad ways to flush the DNS cache in your device. As stated before, the reason why a DNS cache needs to be flushed is that outdated records can result in 404 and timeout errors. By clearing the cache, the faulty data is purged, and new data can be obtained. This solves the issue of 404 and timeout errors.
Related Blogs
What is a DNS Zone: All You Need to Know About?
DNS Zones Made Easy — Understand What Keeps Your Domain Running
- 26 May 2025

What Is a DNS Server and How Does It Work?
Learn what a DNS server does, how DNS translates domain names into IP addresses, and how different DNS server types work together to load websites quickly.
- 19 Jan 2026
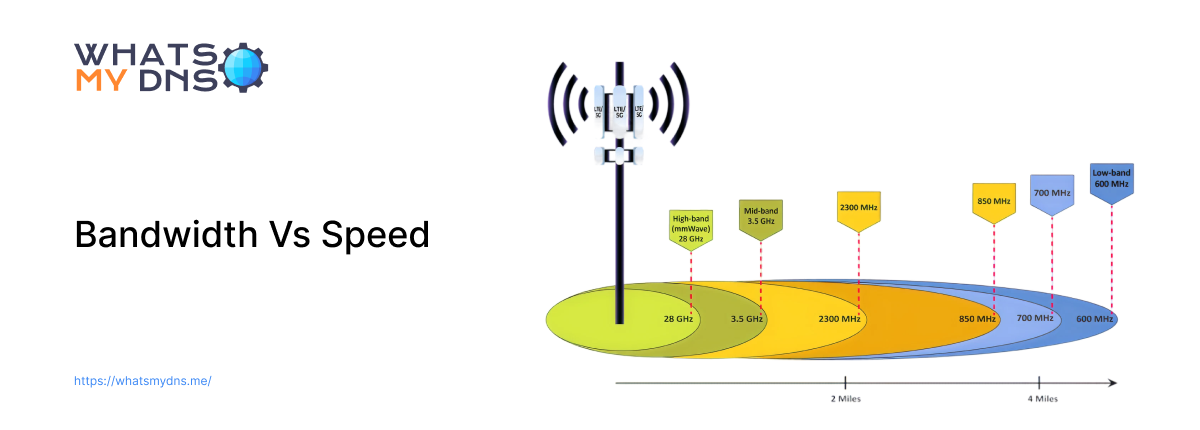
Bandwidth Vs Speed - A Complete Guide to Understand the Difference
Learn how bandwidth and speed differ, how they impact your internet performance, and why both matter for your connection
- 02 Jul 2025